
I’ve been spending a lot of time talking about RubyMotion recently, and I was intending to post the second in my Introduction to Programming series today to give the whole Motion thing a break. But I spent far too long on Tuesday getting an app correctly deploying through Testflight, and it was a really painful process. I took copious notes while making it happen, though, so in the interest of saving someone else’s time, here is my step-by-step guide to successfully getting an app from your RubyMotion simulator onto someone else’s device.
1. Set up your Apple Developer Account
This step is pretty obvious and if you’re actually interested in deploying at all, it’s probably already complete. But I promised a step-by-step guide, and this is certainly step number one (or more like number zero). If you want to deploy to other people’s devices you need an Apple developer account. Sign up for one at Apple’s developer member center. Buying the iOS development license will set you back $100/year.
2. Create a Distribution Certificate
You’ll have to create a development certificate first. Once that’s done, set yourself up with a distribution certificate.
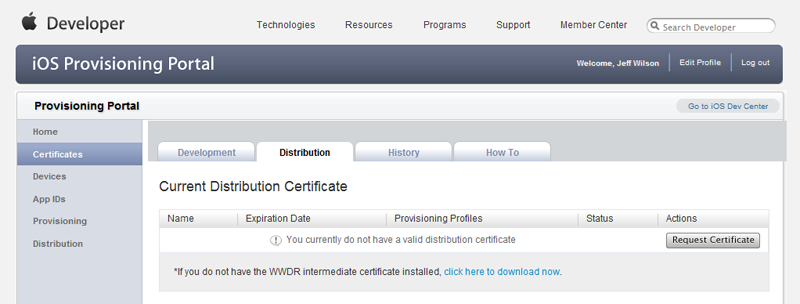
You need to press that big gray button that says, “Request Certificate.” This distribution certificate is what you’ll need to sign the eventual app with. If you use the wrong certificate or don’t have one at all, most likely your friends will get the dreaded “Unable to Download” Testflight error, which is certainly among the least helpful error messages I’ve ever come across.
When you’ve saved the distribution certificate, click on it to add it to your keychain. Note its name: it will be something like, “iPhone Distribution Profile: Your Name.” Make sure you remember the name of this certificate, as you will need it in step 6.
3. Add Devices
This is probably the most straightforward step. Head to the devices section, click the “Add Devices” button and start adding devices by their UDID. If you’re doing this with a friend, link them to the first Google result for finding your UDID, which is both helpful and actually available for viewing by your developer-accountless friends, as opposed to Apple’s own instructions which are not.
4. Make an App ID
Technically this step is optional, but likely you’ll eventually want to do push notifications, or in-app purchases, or something like that. So you may as well get an App ID now and save yourself the trouble of doing so later.
Head over to the Create App ID page and fill in all the necessary values. There’s one field of particular importance to us, however: the bundle identifier. The usual style is com.yourCompany.yourApp, so go for something like that. Remember what you wrote here, as you’ll need it again in step 6!
5. Create a Provisioning Profile, Referencing Your Devices

Head on over to the distribution provisioning portal and create a distribution provisioning profile. Ensure you select “Ad Hoc” for your distribution method (unless you’re releasing to the App Store), and select the devices you entered in step 3. Submit the profile and hit Command-R until it’s moved from pending to active. Download it; note the location you saved it to as well as its file name. Another thing we need to know for step 6.
6. Update your RubyMotion Rakefile
Stop! Do you have:
- The name of your distribution certificate, from step 2?
- The bundle identifier, from step 4?
- The filename and path of the distribution provisioning profile, from step 5?
If you answered yes to all those questions, good for you! Proceed onwards. If not, check your reading comprehension skills and go back a few steps.
Now that we have all that important information, we have to put it into our Rakefile.
1 2 3 4 5 6 7 8 9 10 11 12 13 14 15 16 17 | |
Failure to set any of these values correctly will result in either compilation errors or installation errors and will probably be nightmarishly difficult to track down and fix.
7. Set up Testflight
Follow the steps for doing this on the very helpful RubyMotion article. Afterwards, your Rakefile will look something like this:
1 2 3 4 5 6 7 8 9 10 11 12 13 | |
Finally, you should be able to rake testflight notes='What a helpful step-by-step guide!' to actually deploy your app to Testflight, and your users should be able to download and install it no problem.
Writing this all down, it seems rather clear and straightforward. While doing it, unfortunately, it is not. Apple’s documentation is really obtuse and the error messages you get during the process are seriously unhelpful. But happily with this guide you should be more or less good to go.